I love Valentine's day and February. I love any excuse to tell the people that mean the most to me how much I love them. Also, since I know my hubby reads my blog...I LOVE YOU! In honor of February, Valentine's day and love, I have lined up the rest of the week with heart themed crafts. I hope you ♥ this week as much as I do!
P.S. I also am clearly aware that February does not start until tomorrow...I just wanted to start a little early.

January 31, 2011
January 29, 2011
Another Potholder
I made another potholder for the contest going on over at Prudent Baby. I had some serious issues going on with my sewing machine, so stitching on the oven mitt applique did NOT work out like I had hoped. The tension kept going completely nuts!!! Part of the reason why I am trying to win one of the sewing machines being offered in the contest.
Here is the front of my potholder. Even with the bad stitching, I was pretty happy with the way it turned out. I even used my Cricut to cut out a pattern for the oven mitt.

I decided to do just a plain back on this one.

Here is the front of my potholder. Even with the bad stitching, I was pretty happy with the way it turned out. I even used my Cricut to cut out a pattern for the oven mitt.

I decided to do just a plain back on this one.

January 27, 2011
Updated the Blog for February
As you have noticed, I updated my blog. It's rather pink...and red! I did this for a few reasons, February not only has Valentine's Day, but it is Heart Month! Also, in just over a week is National Go Red For Women Day! Remember on Friday, February 4th to wear red to help spread awareness that heart disease is the number one killer in not only men, but women too! My mom died from heart disease just over a year ago and I would appreciate seeing as much red as possible next Friday. Also, if you want to learn more about Heart month, click on the banner in the top right section of my blog or the one at the bottom of this post. I will have the banner on my blog from now until the end of February.

January 26, 2011
All Those Great Ideas
If you are like me, you often see great ideas of things you want to make but just may not have the time, money or items to make it. You then throw it on that mental list that likes to randomly erase things and forget about it. Well, that's usually what happens to me. I figured out a solution to that problem. I have created an idea book.
I managed to find, while cleaning my house, over 400 page protectors and lots of empty binders. I took one of the binders and lots of page protectors and have been sliding in all those great ideas, from magazines, online, etc. It is definitely helping me clear the clutter, since I had been holding onto a few magazines that had some great ideas in them. My magazine pile is getting much smaller now. I also now have a project list that keeps getting longer.

I even found lots of dividers too. I haven't filled the idea book enough yet to divide them into categories, but they are there for when I need them.

On the right side, it is the front of the article that I wanted to recreate. Behind them is any other pages or ideas that are similar. The very front page shown in the top photo is new ideas on how to recreate your family tree, from Martha Stewart Living. The bottom photo, on the left is the rest of the article on recreating the family tree and on the right is another idea that I liked. Fairly straightforward and simple, but I have a feeling it is going to be super useful. Now I need to print out all those PDF tutorials that I have saved...just in case something happens to my computer.
January 25, 2011
Ocean Mist
Last night after the kids went to bed I decided I needed some power tool therapy. Seriously, this is better than a shrink! Power tools have a calming effect, I think it's the ability to create, destroy and the white noise. Anways, I needed to destress so I decided to turn a pen.
I chose an acrylic blank called ocean mist. Ooohhh, isn't it pretty?


So, instead of getting two pens done, I only got one. Oh well, the one turned out well and is really pretty. See!

Another angle. The only thing that caught me by surprise with this is you can see the brass pen tube through some of it. The acrylic was a mix of opaque colors and translucent colors and I thought it was only opaque. Oh well, the shiny brass tube actually adds to this, so YAY for happy accidents.

I chose an acrylic blank called ocean mist. Ooohhh, isn't it pretty?

Check out me in my safety gear. The mask is needed as the acrylic has a tendancy to throw little pieces of plastic at you, which can hurt.

The unfortunate part of turning pens, they can do what is called a blow out. The blank on the right as you can see had a blow out, but I still had the one on the left.
So, instead of getting two pens done, I only got one. Oh well, the one turned out well and is really pretty. See!

Another angle. The only thing that caught me by surprise with this is you can see the brass pen tube through some of it. The acrylic was a mix of opaque colors and translucent colors and I thought it was only opaque. Oh well, the shiny brass tube actually adds to this, so YAY for happy accidents.

January 24, 2011
Art Nouveau Inspired Painting
I have an idea book that I was flipping through last night and came across this.
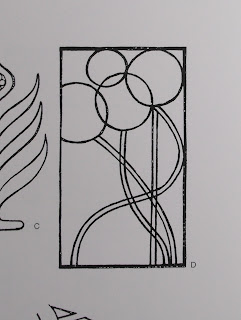
My interpretation of this was that they were either flowers or balloons. I chose flowers and used this as my inspiration for a watercolor painting. I did a light pencil drawing on watercolor paper, so light in fact that I couldn't get a decent photo to show you. So this next photo was taken after I had laid down all the watercolor. I planned on taking a photo before I started to outline everything with my marker, but I got distracted by my kids and came back and forget about it until part way through, as seen below.

I chose colors that would overlap well. Painting this gave me some flashbacks to my childhood and me playing with different colored transparency film in elementary art class to teach us about combining colors to make new colors. Here is a detail photo of the "flowers."

Now, here is the completed painting. As a little FYI, the lines are actually straight in real life, the lens on my camera does a little fish eye on things when I do macro shots. The final painting is 9x12 inches (that includes the white border).

I haven't thought of a title for this painting yet. I also haven't decided what I am going to do with it. I really just wanted to brush up on my watercolor, since I haven't done one in almost two years. Which is embarrassing for me, since it is my favorite medium to work in. I am more than a little rusty and hope to remedy that soon.
January 21, 2011
Gift Baskets
As you know, I am part of a MOMS Club and our club is doing our 8th Preschool Fair. I am in charge of it for the second year in a row. We raffle off gift baskets to people in attendance and so today I have been putting together gifts baskets.

This is the Family Movie Night gift basket. Inside is 4 movies, 6 bags of popcorn, 2 popcorn holders, 1 bag of animal crackers (for the little ones who can't have popcorn yet) and 4 boxes of candy. I made the tag on the front to show off what the basket's theme was. Not bad for doing this last minute.
I will be back doing more crafts next week, after I recover from all the craziness that is the preschool fair.
January 20, 2011
Oohhh, It's a Ghost!!!
Actually, it's a little dry ice and water...but to my son, it was a ghost and he is fascinated by ghosts.

We received a shipment of meat and in the cooler was a bag of dry ice. So, I put it to good use and had some fun with the kids. I got out my large pot, put the dry ice in it (using gloves so I wouldn't get a freezer burn) and handed my son a cup of water and told him to pour it in.

There was so much amazement and wonder in both of my children as they watched the "smoke" grow and overflow the pot.

It was such a great activity to do with the kids. I don't think I ever would have just gone out to buy dry ice, but since we had some just laying around. I told this to a girlfriend of mine and she told me about something she saw at the Children's Museum in Austin, TX. They added a small amount (like a few drops) of dish soap and it apparently created, "smoke bubbles." When you popped the bubbles, you would then see the "smoke." Actually, the smoke is carbon dioxide, so if you decide to have any fun with dry ice, please do it in a well ventilated room. So, that fun experiment will be tried out the next time we end up with some dry ice just laying around.
I also completely forgot about doing the balloon experiment with it too. Place a small piece of dry ice in a latex balloon and as the dry ice transforms from a solid to a gas, it inflates the balloon.
January 18, 2011
Blast From the Past
I figure instead of not posting anything today, that I would post a piece of work that I did in the past that I love and would love to share with you. Today I am sharing with you, "Fruit Bowl." I know, real original name right, but this is on my counter and is used as my fruit bowl.

I am part of MOMS Club and we went to a ceramic painting place one night for a MOMS Night Out. This is what I painted and the reason I painted the fruit in it...so that there would always be fruit in my fruit bowl, even if it wasn't real fruit. The messy outlining of the fruit was done intentionally. The outside of the bowl was done with a flecked red glaze, the flecks are white. I highly encourage anyone to go out and paint pottery, it was a blast and so much fun with a group of friends. A lot of these pottery places even do birthday parties. Just an idea!

I am part of MOMS Club and we went to a ceramic painting place one night for a MOMS Night Out. This is what I painted and the reason I painted the fruit in it...so that there would always be fruit in my fruit bowl, even if it wasn't real fruit. The messy outlining of the fruit was done intentionally. The outside of the bowl was done with a flecked red glaze, the flecks are white. I highly encourage anyone to go out and paint pottery, it was a blast and so much fun with a group of friends. A lot of these pottery places even do birthday parties. Just an idea!
January 17, 2011
Pot Holders
I am hooked on Prudent Baby. I love that blog and I can say, that was the blog that made me want to get into sewing. They have so many cute projects and tutorials over there. Anyways, I used their Pretty Potholders tutorial found here as a guide and made one myself. Now, mine is not perfect, because I did not follow the tutorial step by step. Now that I have made a few mistakes, I can correct them and make a better one. I am thinking for my next one to make it a round pot holder. Hmmm...yes, I like that idea.
Anyways, here is the front and back of the potholder I made last night. I have some quilted details and a pocket. Overall, I think it turned out cute and am pretty happy with it.


Anyways, here is the front and back of the potholder I made last night. I have some quilted details and a pocket. Overall, I think it turned out cute and am pretty happy with it.


January 15, 2011
What a Beautiful Gift
As you know, we went and stayed with my In-laws for Christmas and had a great time. We left a few things behind to be mailed to us. I got a couple boxes in the mail and there was something in one that came as a very pleasant surprise. It was this blanket.

Isn't is just beautiful? Attached to it was a note that said, "Give to Jim and Les (my in-laws). For your first grandchild. Yvette (Hubby's grandmother that passed away before we had kids)." I honestly couldn't think of a better surprise than that. This isn't the first blanket that we have that Yvette made, but right now, the one that has touched my heart the most.

These two blocks are my favorite ones. The neatest thing about all of this, my oldest son is obsessed with birds. He loves them and pointing them out to me. It's one of those things that was just meant to be I guess.


Isn't is just beautiful? Attached to it was a note that said, "Give to Jim and Les (my in-laws). For your first grandchild. Yvette (Hubby's grandmother that passed away before we had kids)." I honestly couldn't think of a better surprise than that. This isn't the first blanket that we have that Yvette made, but right now, the one that has touched my heart the most.
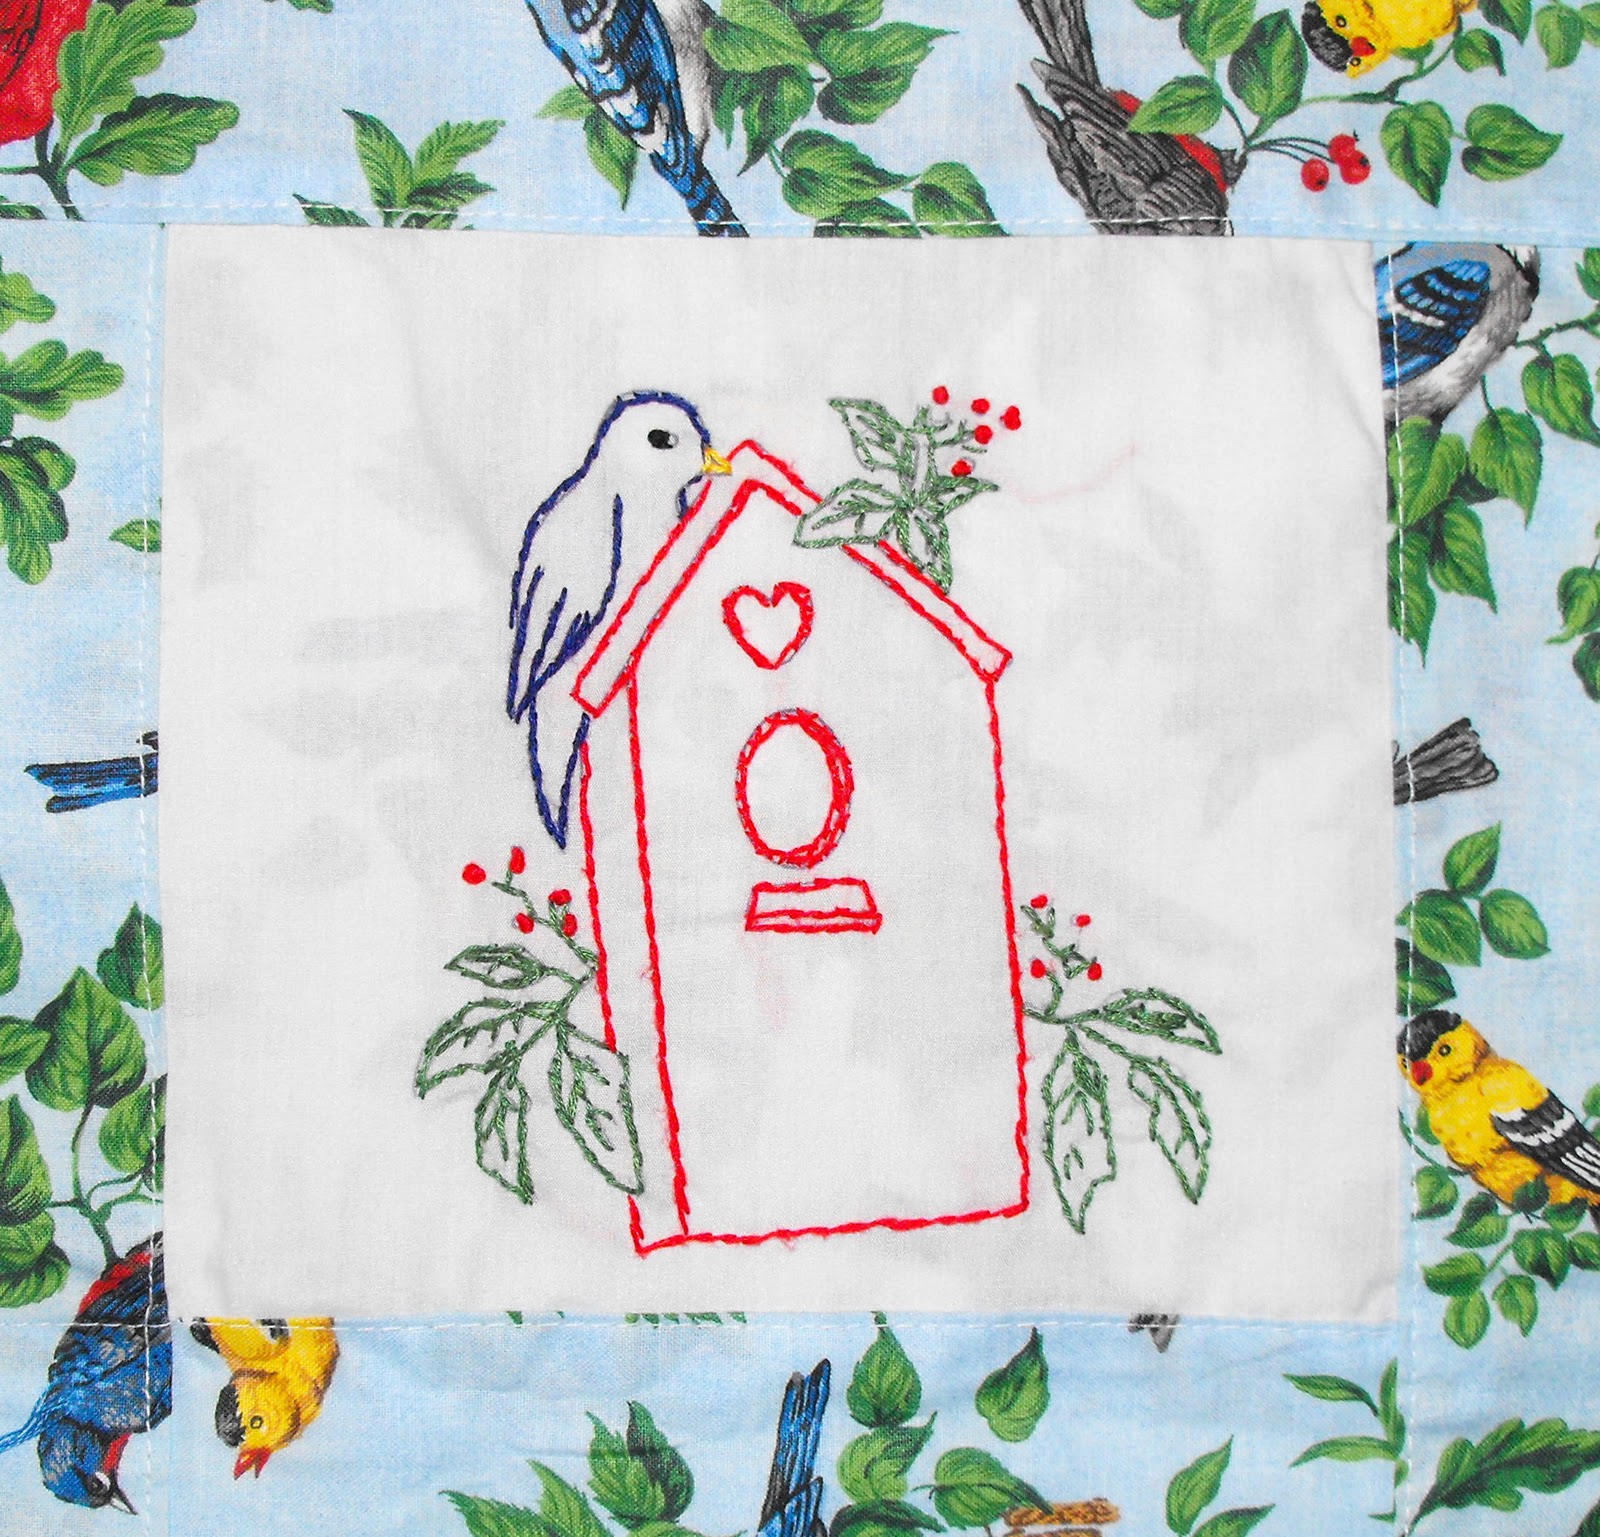
These two blocks are my favorite ones. The neatest thing about all of this, my oldest son is obsessed with birds. He loves them and pointing them out to me. It's one of those things that was just meant to be I guess.

January 13, 2011
Cute Gathered Clutch
I saw this cute tutorial over at Noodlehead and decided I had to make one. Now, I will admit I did not follow the tutorial, just looked at the photo and said, I could do that! Now, I know I am horrible about following directions and I personally learn more when I make mistakes. I understand that does not work for everyone so please follow the tutorial found here.

See, super cute! The clutch is 8.5 x 5.5 inches, with a zipper closure and a divided pocket on the inside.

The magenta colored fabric is "Flora and Fauna Dandelions," in Fuchsia by Michael Miller.

The black and off white fabric used for the lining is "April in Paris Stripes," by Timeless Treasures. For the pocket and stripe on the front, I just used a plain turquoise fabric.

I love bright colors and love how this came together. Too bad I will be giving it away. My cousin posted this on Facebook and I signed up to be one of her 5 so I posted it too, "
January 12, 2011
I Could Do That: Spiced Mug Mats
My MIL gave me a set of spiced mug mats for Christmas. I had never seen these before but they are a really awesome gift, especially since I am a coffee drinker. They look a little 'folksy' for my taste which got me thinking, I could do that! I could totally make a set out of a way cuter fabric.

So I offered one up as a sacrifice and dissected it. As I found out, much simpler than I could have imagined.

We have our fabric, a layer of batting, the potpourri, a second layer of batting and then fabric.

After a little poking around on the internet, (how I love the internet and google search) I discovered that the potpourri used is dried orange peel. Smells absolutely heavenly!
So I have now taken the liberty of ordering some fabric to reproduce some for gifts (and a set for myself of course). I am also going to poke around a little more on the internet to see if I should make my own potpourri or just buy some and I have some batting laying around my art room. So, once I have everything together I will make a few and post a tutorial. So stay tuned for that!
January 10, 2011
Therapy
When I first started scrapbooking, I told myself that I wouldn't fall more than a year behind in my scrapbook. I set that goal because of so many people that I have known that would be 2 and 3 years behind. It's like the last kid's baby book is always put together haphazardly. I have been scrapbooking for 5 years now and this is the first time I have fallen more than a year behind.
Just over a year ago, my mom passed at away at 60 years old. She was terminally ill and in the end, went down hill very fast. I had planned to go visit her in the spring, but she passed two days after Christmas in 2009. The hardest thing for me when I think about it all, she never got to meet my youngest son Colton who was born in October of 2009. I was afraid of flying with him so young with that whole swine flu craziness was going on. I ultimately ended up having to fly to Colorado right after she passed with both of my boys in tow and we were all sick with sinus infections too.
It was a rough year dealing with my mom passing, I still harbor a lot of anger towards an ER doctor who told her on Christmas Eve, "You can go home and follow up with your doctor, it's not like you are going to die tomorrow." She passed two days later. I miss her greatly and it took quite a bit of adjusting to deal without her. I use to speak to her almost daily. My mom was a plethora of information when it came to kids. I credit a lot of what I learned about being a mom from her. She was the one person I could call anytime of day and it wouldn't matter. I miss my mom dearly and this is why my scrapbook was stuck on her page for the last six months. Sunday night I brought myself to sit down in front of my scrapbook and do my mom's page. It isn't the most elegant or fancy page I've done, but I wanted something simple. The photos are a mix of the last time I saw my mom, which was in October of 2008 and from her memorial service.
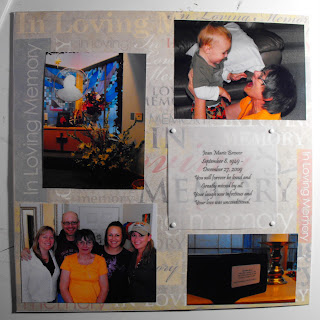
I need to add, it is EXTREMELY difficult to find scrapbook stuff that has to deal with the death of anyone. Scrapbook companies out there, please make more items available that deals with honoring someone who has passed. I must add, please excuse the horrible photo of the page, it was late and I was very emotional, still am. Doing this post is some serious therapy for me as I have not put down any of this. I am hoping that it will help me release some of the pain that I still have and anger that I have been harboring.
Just over a year ago, my mom passed at away at 60 years old. She was terminally ill and in the end, went down hill very fast. I had planned to go visit her in the spring, but she passed two days after Christmas in 2009. The hardest thing for me when I think about it all, she never got to meet my youngest son Colton who was born in October of 2009. I was afraid of flying with him so young with that whole swine flu craziness was going on. I ultimately ended up having to fly to Colorado right after she passed with both of my boys in tow and we were all sick with sinus infections too.
It was a rough year dealing with my mom passing, I still harbor a lot of anger towards an ER doctor who told her on Christmas Eve, "You can go home and follow up with your doctor, it's not like you are going to die tomorrow." She passed two days later. I miss her greatly and it took quite a bit of adjusting to deal without her. I use to speak to her almost daily. My mom was a plethora of information when it came to kids. I credit a lot of what I learned about being a mom from her. She was the one person I could call anytime of day and it wouldn't matter. I miss my mom dearly and this is why my scrapbook was stuck on her page for the last six months. Sunday night I brought myself to sit down in front of my scrapbook and do my mom's page. It isn't the most elegant or fancy page I've done, but I wanted something simple. The photos are a mix of the last time I saw my mom, which was in October of 2008 and from her memorial service.
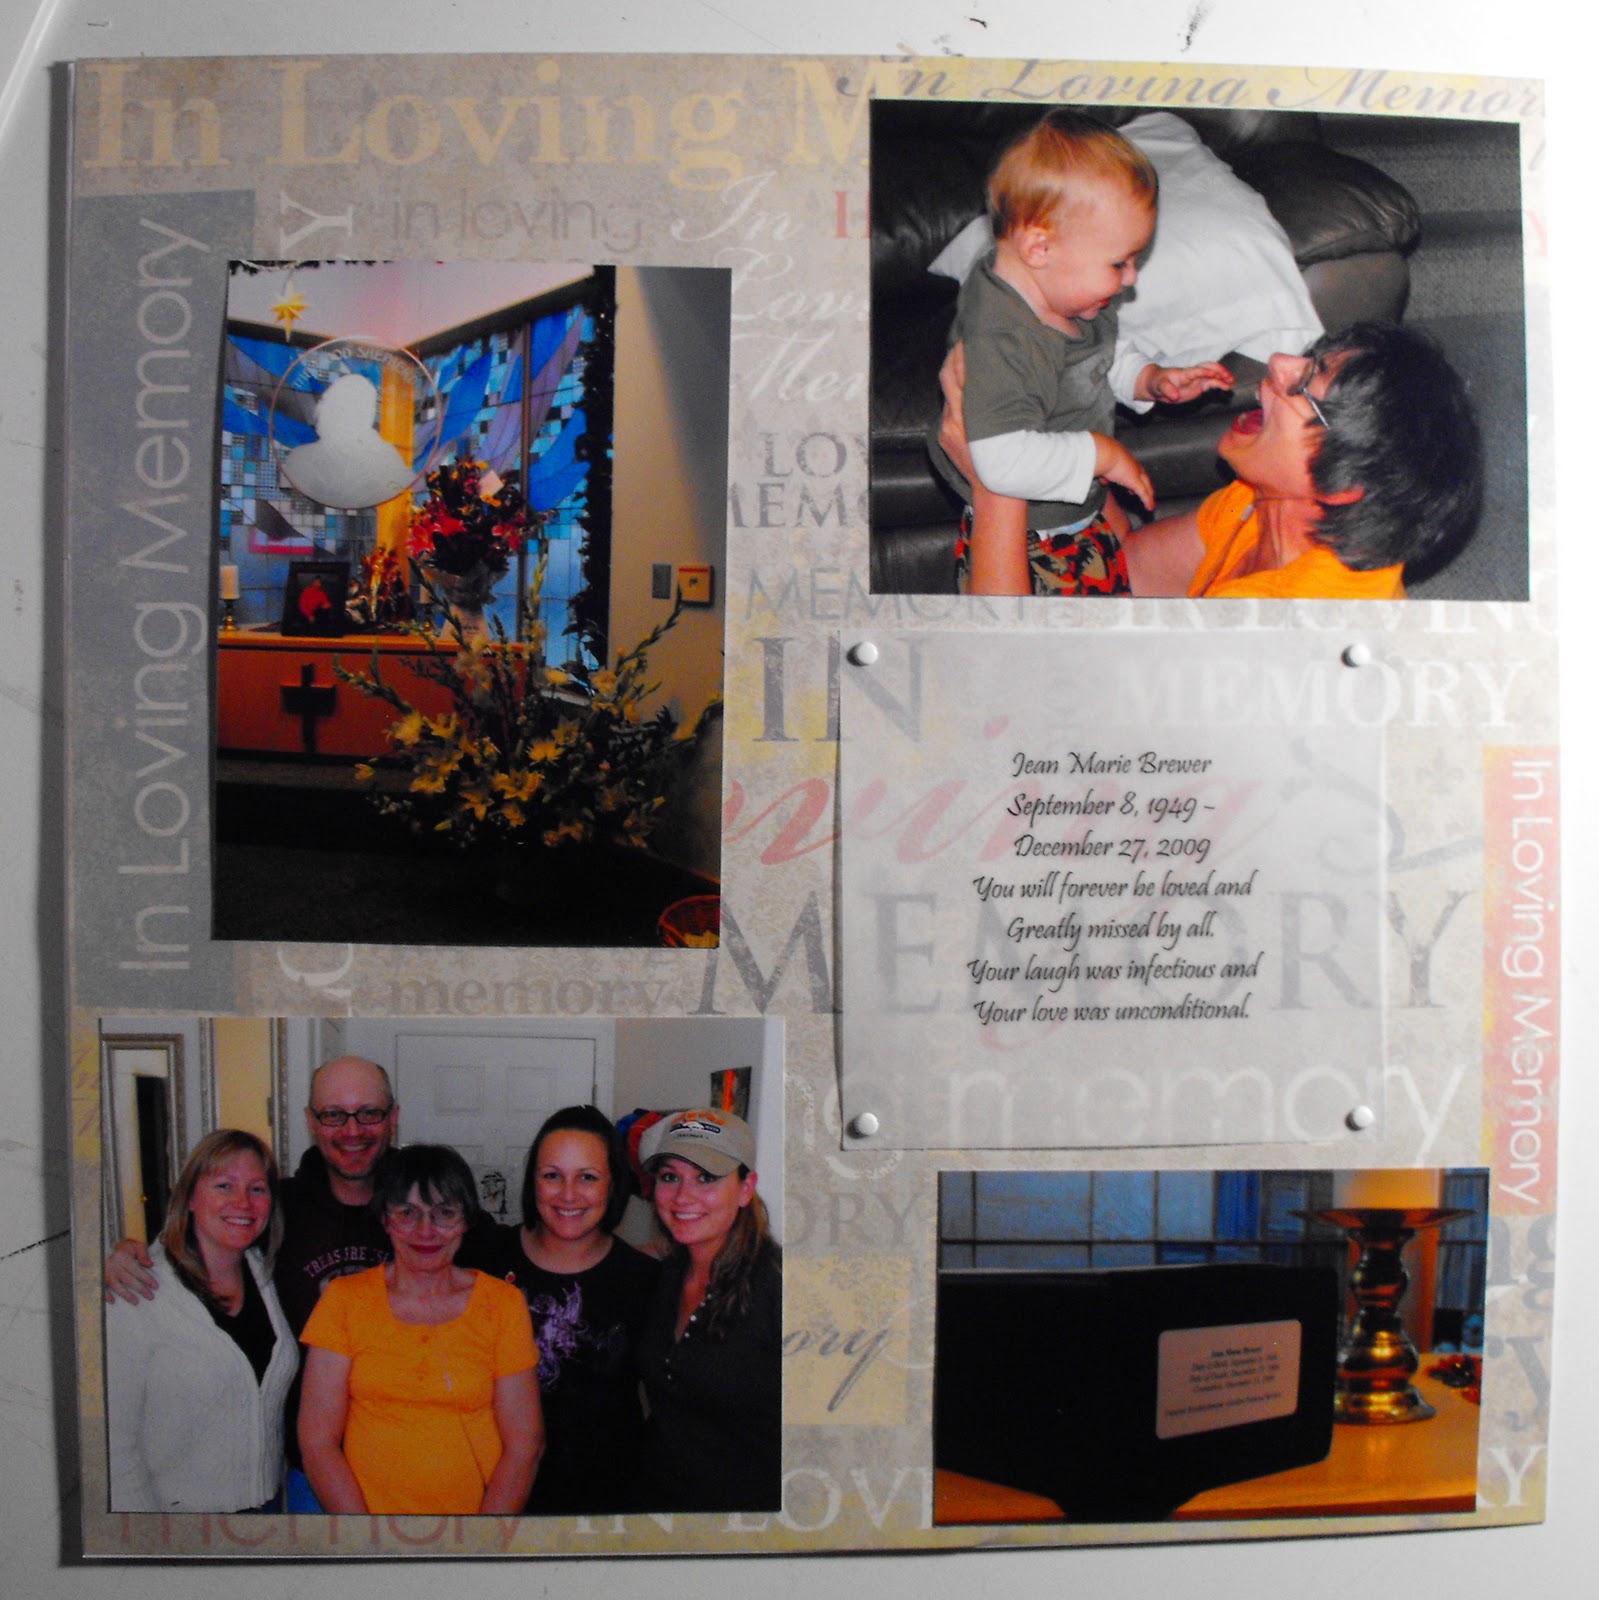
(this is what is written on the vellum)
Jean Marie Brewer
September 8, 1949 -
December 27, 2009
You will forever be loved and
Greatly missed by all.
Your laugh was infectious and
Your love was unconditional.
I need to add, it is EXTREMELY difficult to find scrapbook stuff that has to deal with the death of anyone. Scrapbook companies out there, please make more items available that deals with honoring someone who has passed. I must add, please excuse the horrible photo of the page, it was late and I was very emotional, still am. Doing this post is some serious therapy for me as I have not put down any of this. I am hoping that it will help me release some of the pain that I still have and anger that I have been harboring.
January 9, 2011
Point of View
Friday, the sky over Texas was quite beautiful. Of course it was signaling a cold front coming, but still just beautiful. My boys and I decided to take full advantage of it and play in the yard and sidewalk chalk the driveway. While doing this, I was trying to figure out the best way to capture the stunning sky and so I laid down and looked up. It was then that one of my boys jumped on my stomach and I realized what a cool background the sky was. This is when I busted out my camera and started taking some photos.
A little side note and being technical. When taking photographs from this angle, where you are looking up at your subject from lower ground is called "worm's eye view." If you are use to just snapping photos of your kids from a head on or slightly elevated angle, try getting down low. Get on their level or lower and you will get a great view and perspective on how they see things.

Colton showing me, "Up!" He wanted me to see the sky and clouds. He is 15 months old and very curious about his surroundings right now.

Maben was riding on my feet like an airplane. This was the only way I could get him to be "almost" still long enough for me to get a good shot of him.
A little side note and being technical. When taking photographs from this angle, where you are looking up at your subject from lower ground is called "worm's eye view." If you are use to just snapping photos of your kids from a head on or slightly elevated angle, try getting down low. Get on their level or lower and you will get a great view and perspective on how they see things.


Maben was riding on my feet like an airplane. This was the only way I could get him to be "almost" still long enough for me to get a good shot of him.
January 6, 2011
Blog Badge
Take a look at what I did last night. Look on the right, now scroll a little down. That's right, I have a blog badge now. Not that I have a ton of readers at the moment, but I have faith they will come. When they do, I will be ready for them. I found by far the easiest tutorial ever from Everyday Living. Now, I can't say that I read that blog ever before this, this is just the first tutorial that I found that I liked and it worked. So big thanks to Everyday Living!
So, if you like me, use my badge/button/whatever you want to call it and promote me! (I know, totally shameless, but I am okay with that) Now, what else to add to the blog before I get swamped with readers...hmmm.
So, if you like me, use my badge/button/whatever you want to call it and promote me! (I know, totally shameless, but I am okay with that) Now, what else to add to the blog before I get swamped with readers...hmmm.
January 5, 2011
Look What I Found
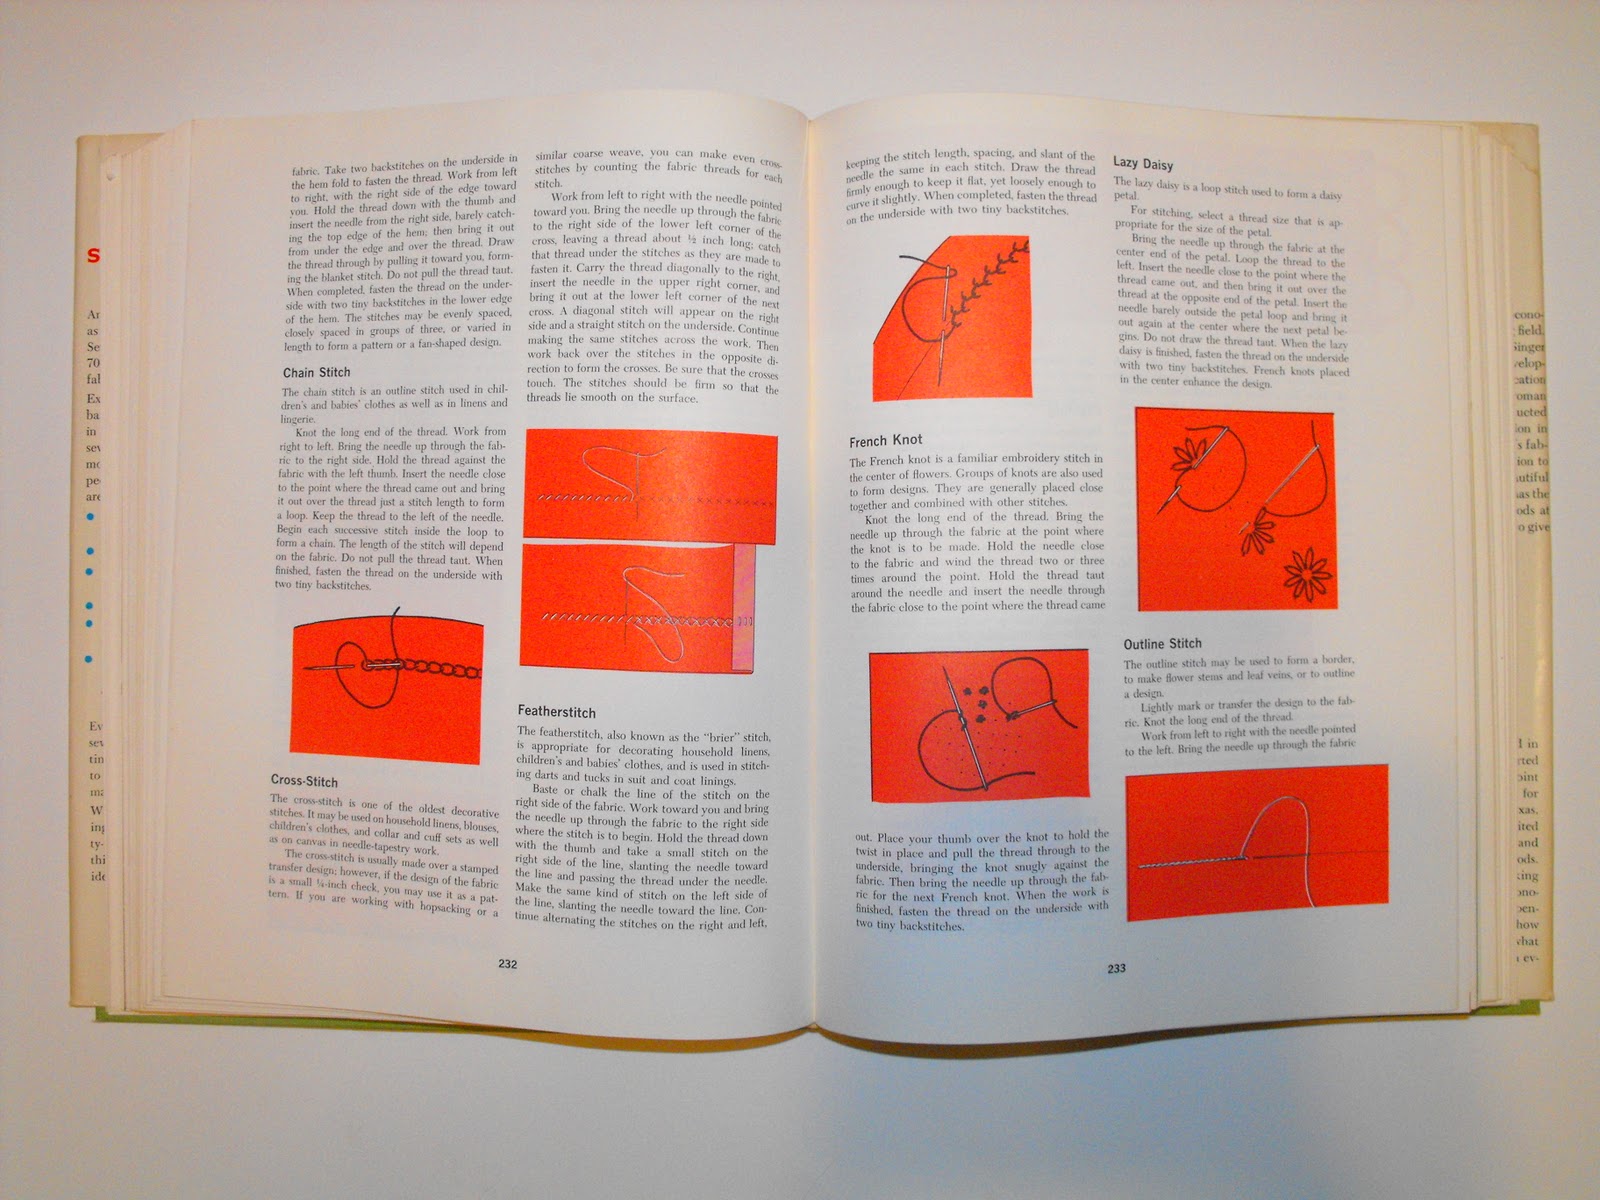
I went to my local used bookstore the other day and couldn't believe what I found, the book that would become my sewing bible. It is a Singer Sewing Book from 1972. There are 500 pages of sewing goodness. I can't believe how detailed this book is and it is extremely more useful than my 7th grade home economics education that my sewing has been coasting on...and what I have picked up from tutorials on the internet.

The chapters are set up easily and very detailed. I was surprised when it even covered curtains, slipcovers and bedspreads.
I will leave you with a few snapshots of some pages from the book that will teach me so much!


The chapters are set up easily and very detailed. I was surprised when it even covered curtains, slipcovers and bedspreads.
- A place to sew
- Your sewing machine
- What you should know about color and fabric
- Beginning to sew
- Pattern Preliminaries
- Fitting the pattern to your figure
- Laying out pattern and cutting
- Assembling your work
- Pressing as you sew
- Fitting as you sew
- Seams, seams, seams
- Underlining and lining
- Darts, tucks and gathers
- Buttonholes without tears
- Pick a pretty pocket
- Neckline finishes
- Waistline joinings and waistbands
- Sleeve styles and finishes
- Homeward bound: zippers, hems, belts and buttons
- Pleats and godets
- Fabrics that require special handling
- Hand sewing - plain and fancy
- Decorative touches
- Zig-zag sewing
- Using your machine accessories
- Sewing for children
- Tips on mending
- Graduate to tailoring
- Introduction to home decorating
- A look at your windows
- Success with curtains
- Set the stage with draperies
- Top it off with a valance or cornice
- Brighten your room with slipcovers
- Make your own bedspreads
- The many faces of knits
- Glossary of sewing terms
- Index
I will leave you with a few snapshots of some pages from the book that will teach me so much!


January 4, 2011
Origami Sewing
Okay, the pure inspiration that hit me the other day...combining origami and sewing. I am sure it isn't an original idea, but it was to me. I remember making origami samurai hats a lot as a kid and thought, "how cool would that be for my boys!?!" I then also was trying to think of a way to make it so it would last longer...then it hit me, with fabric! That would last much longer than newspaper and how hard would it really be? Now, I can imagine this wouldn't work with all origami, but figured it was worth a shot for the samurai hat.
Excuse the photos, I did not take as much care or time taking them as I should have, but am showing them anyways because I deemed the project a total success!
Items needed:

The first step is to cut both of your pieces of fabric 18 inches square. I then sewed them right sides together with a 1/4" from edge, leaving room to turn. Clip the corners, turn and press.

Once the edges were pressed, stitched 3/16" top stitch all the way around. I then started my folding. I pressed between each fold. I had this memorized from when I was a kid, but did this quick drawing of my modifications just for you! This differs slightly from a traditional origami samurai hat...but if you find one you prefer to my drawing, (and I will take no offense) I am sure you can follow that just fine.

A select few of the steps will the shown below in photographs.


I then pinned the last fold, because even with ironing each fold, it was too thick to get it to stay. In the brim of the hat, I then stitched in the middle to get it to stay, then flipped the hat over and stitched the back side too at the same height. My boys had fun wearing it and it held it's shape well, which was the biggest shock of all to me!


Excuse the photos, I did not take as much care or time taking them as I should have, but am showing them anyways because I deemed the project a total success!
Items needed:
- Scissors/rotary cutting tool
- Sewing machine and thread
- Ruler
- Iron
- 2 fabrics of your choice

The first step is to cut both of your pieces of fabric 18 inches square. I then sewed them right sides together with a 1/4" from edge, leaving room to turn. Clip the corners, turn and press.

Once the edges were pressed, stitched 3/16" top stitch all the way around. I then started my folding. I pressed between each fold. I had this memorized from when I was a kid, but did this quick drawing of my modifications just for you! This differs slightly from a traditional origami samurai hat...but if you find one you prefer to my drawing, (and I will take no offense) I am sure you can follow that just fine.

A select few of the steps will the shown below in photographs.


I then pinned the last fold, because even with ironing each fold, it was too thick to get it to stay. In the brim of the hat, I then stitched in the middle to get it to stay, then flipped the hat over and stitched the back side too at the same height. My boys had fun wearing it and it held it's shape well, which was the biggest shock of all to me!


January 3, 2011
Inspiration has struck!
Okay, I may be saying this a little early, but 2011 has been excellent to me so far! I had an idea that struck me like a ton of bricks today. Now, I haven't poked around to see if anyone else on the web has tried this...but the idea did hit me without influence from anyone else. I was sitting around thinking about what I wanted to do next for a craft project and I started to flash back to things I use to do as a kid and what I do now and then it hit. So, this week, I will be posting something that will be either creative genius or epic fail. Stay tuned!
January 1, 2011
Departing Vermont
Yesterday, I found myself and the family departing Vermont and heading back to our life in Texas. It was a great vacation and we all had a wonderful time. I took an amazing amount of photographs and I am so happy that I got to share some of my favorites with all my blog readers. I personally love photographs because I have a horrible memory. I love to know that I am preserving memories that might fade away with time. I know that I currently do not have many blog readers right now, but hope that with this new year I will find many more.
I want to wish everyone a Happy New Year. I closed out my year wonderfully and hope to find the beginning of 2011 a very inspiring one. I hope that all my readers find inspiration and passion. I will leave you all with a great photo of a sunrise in Vermont, from the deck of my in-laws house. This was taken the last morning we spent in Vermont.

I want to wish everyone a Happy New Year. I closed out my year wonderfully and hope to find the beginning of 2011 a very inspiring one. I hope that all my readers find inspiration and passion. I will leave you all with a great photo of a sunrise in Vermont, from the deck of my in-laws house. This was taken the last morning we spent in Vermont.

Subscribe to:
Posts (Atom)